So remember my last Research blog update where I talked about the Perry Lab endeavors to find the best possible way to smush lice for DNA extractions? Well I'm at it again!
As I've previously mentioned, there are three main tasks to complete when beginning a new DNA sequencing project: 1) get the DNA out of your sample, 2) prepare your DNA libraries for sequencing, and 3) do both 1 and 2 in a cost-effective manner. I dedicated yesterday to step 2 of this process.
| A DNA library is pretty much what it sounds like: all of the genomic DNA from an individual sorted and organized in such a way that it is more amenable to sequencing. A good portion of genomic sequencing is performed on machines made by Illumina, so naturally they've also created kits for preparing your DNA libraries. The Perry Lab has had success with these kits, but recall point 3 from above: costs. Kits are generally more expensive than what are referred to as "in-house" protocols because you can typically buy the same reagents you would use in the kit in bulk for a lower price. Enter Matthias Meyer and Martin Kircher. | 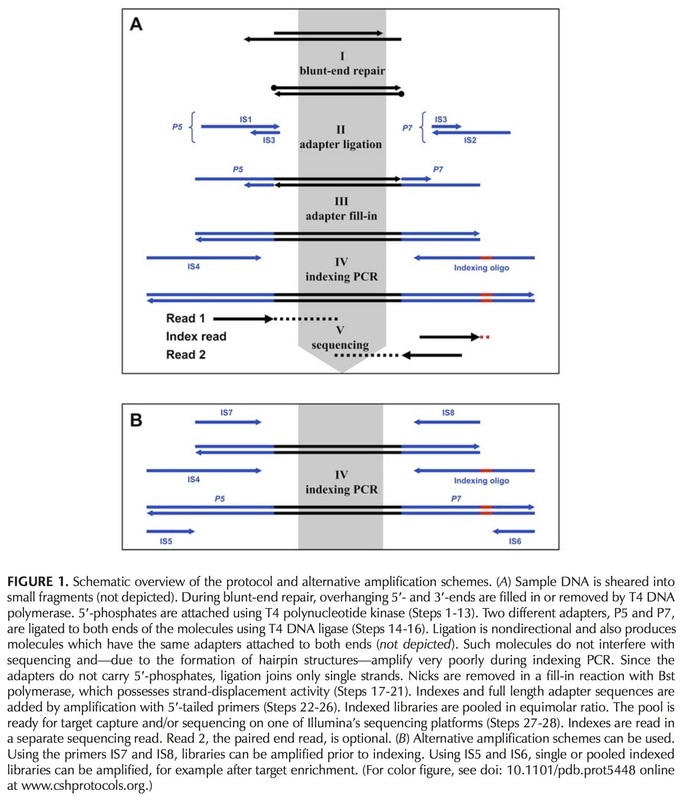 Meyer & Kircher 2010 Cold Spring Harbor Protocols |
Meyer & Kircher's protocol Illumina sequencing library preparation for highly multiplexed target capture and sequencing (M&K) has become a Perry Lab standard. M&K is nearly identical to Illumina's equivalent library prep protocol (see above figure), with the only real difference being the making of master mixes. The nice thing about kits is that every reagent you'll need is already prepared for you in a proprietary concoction, so you can just grab and go with each step. For M&K, you have to put together the same ingredients that are found in the ready-made mixes. This adds a bit of time, but in the end the procedure is a bit more controlled by the research group, which is handy if protocols need to be adapted for any particular reason (ours is ancient DNA).
 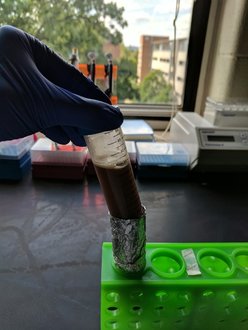 | The really cool thing about both of these protocols is the use of magnetic beads to directly manipulate the DNA strands in their solution (see depiction at left for Agencourt AMpure XP beads). We make our own Solid Phase Reversible Immobilization (SPRI) beads in-house for use in both our ancient and modern lab spaces. The sort of gross looking tube of brown to the left contains these teeny tiny SPRI beads that we can use to "clean" our DNA throughout the library prep process. We can also manipulate the ratio of beads to DNA to select DNA fragments of whatever length we are targeting - in DNA sequencing, length matters. (For those who are curious, the tube is wrapped in foil because the beads are photosensitive and will degrade if exposed to too much light.) |
SPRI beads are only magnetic when they are in the presence of a magnetic field, and we have three kinds of magnets to choose from in the Perry Lab, as pictured below. I hardly ever use the green one, as it is designed to hold tube of a much larger volume than I typically work with. I'll focus the rest of the blog on the other two: stand magnet on the left and ring magnet on the right.
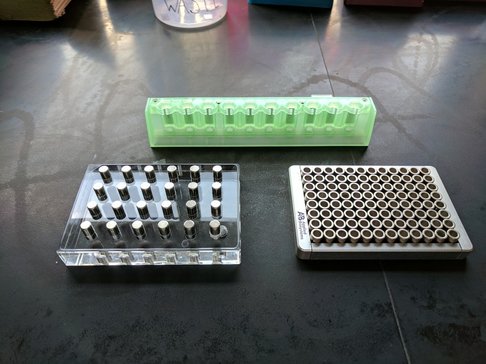
Both of these magnets are designed to work with 96-well plates (pictured below). The entire library prep process occurs within these wells. These plates are made to be sealed and placed into a heated chamber that can be programmed to heat and cool your samples in a particular way to catalyze the reactions required for the various stages of library prep. As you can see, the plates sit differently within the magnets: the stand magnet (clear base) suspends each well between magnetic pegs while the ring magnet allows the wells to nestle directly within a larger magnetic well. In either case the magnet is located at the very top of the peg/well
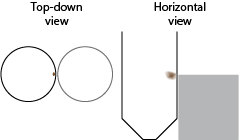
This difference may not seem like such a huge deal, but it can drastically effect how you will conduct yourself in the lab. I attempted to depict this difference below – it essentially boils down to where the beads are located within the tube when attracted to the magnets. The beads tend to form a little blob next to the pegs of the stand magnet, and because the magnetic pegs are arranged to suspend the wells between them, the magnetic DNA blobs tend to fall in an alternating pattern down the rows of the plates (right side, left side, left side, right side, etc). The ring magnet draws the beads into a ring around the inside of the well, and each well’s magnets are suspended exactly the same.
  |   |
This difference is a small one when you are only working with a few samples at the time. Seconds matter for the time-sensitive ethanol washing step, so being able to pipette quickly and accurately is crucial for the library prep process. If you are using a pipette with multiple tips with the stand magnet, it is a bit more difficult to maneuver all of the tips in such a way that you don’t knock the blobs of DNA back into solution. When using multiple tips in a ring stand, you just have to go straight into the wells every single time – there is quite a bit less fiddling involved, and precious seconds can be saved. That said, our stand magnet is slightly more powerful than our ring magnet so we tend to use it more frequently. I’ve ordered a more powerful ring magnet and can’t wait to try it out - I'll be scaling up my sample sizes very soon :) Cheers!
 RSS Feed
